Step-by-step Truck Tax Data Import Instructions

Mileage Import Instructions
KEEP TRUCKIN – Data Import Instructions
What you need to start:
- Your login information for KEEPTRUCKIN.com and for TRUCKeSERVICES.com
- Be sure truck numbers in the Vehicle List of TruckeServices are set up and match the Vehicles set up in Keep Truckin.
- Vehicles not set up in TRUCKeSERVICES with an identical unit number will not upload!
- Know the date of the last data upload. Do not upload data for the same date range more than once.
Now that you are ready:
- Go to https://keeptruckin.com and log in with the email address and password assigned to the Fleet.
- Select “Reports” (located in the upper right-hand section of the screen)
- Select “Trip Reports” from the IFTA report window located in the lower right-side of the screen
- Select “EXPORT” and choose a .csv file for the “GROUP” (all IFTA Vehicles). If IFTA vehicles aren’t set up as a GROUP, select BY VEHICLE and request all IFTA vehicles in the fleet.
- Fill in the range of dates for the data being requested. (Download one month of data at a time.)
- Click on the last little button on the right side of the report selection criteria to run the report.
- A data file will be emailed to the email address used to log into the account.
- Retrieve the email and download the file with a name that helps identify the company, vehicle number, and range of dates in the report.
- Be sure to save to a folder where you can “Browse” to upload into TRUCKeSERVICES.com.
- Repeat for each truck with an IFTA decal if you were not able to download the fleet as an entire group.
- Next, upload the data file to TRUCKeSERVICES.com by logging into TRUCKeSERVICES.
- Be sure the Dashboard shows the company whose data you are about to upload!
- Choose “DATA UPLOAD”. Then select MILEAGE UPLOAD then choose “Keep Truckin” from the drop-down menu.
- Browse for the Trip Reports you downloaded from the email account they were sent to.
- Select the file(s) that you requested from Keep Truckin. The screen will display a message to wait while it imports the data.
- When the data upload is completed, verify no errors occurred during the upload. If any errors are reported to the screen, print the screen and review errors.
- After the file uploads it will be saved in the File Cabinet of the Company and available anytime needed for additional information or audits.
Omnitracs Data Import Instructions
What you need to start:
- Your login information for www.Omnitracs.com/fsm and for TRUCKeSERVICES.com.
- Be sure truck numbers in the Vehicle List of TRUCKeSERVICES are set up and match the Vehicle ID numbers in Omnitracs.
- Vehicles not set up in TRUCKeSERVICES with an identical unit number will not upload!
- Know the date of the last data upload. Do not upload data for the same date range more than once.
Now that you have your information together:
- Go to https://services.omnitracs.com and log in with client password.
- Select Analytics Manager (In Applications section of the window).
- Select “State Miles” tab in the upper left-hand corner of the window.
- Click on “Click here to see State Miles for a specific vehicle” in the lower left-hand section of the window.
Select the vehicle then click on “Go” - Select Date Range then click on “Go” (Download one month of data at a time).
- Click on “Download” at the bottom middle of the window. Then select “Download data”.
- Name the file being downloaded with CompanyAcct_Truck#_Date. Use the end of the month for the date in the file name.
- This file has to have the “.csv” extension on the file name. (It comes that way – just don’t change it)
- Be sure to save to a folder where you can “Browse” to upload into TRUCKeSERVICES.com.
- Repeat for each truck with an IFTA decal.
- To upload data, log into TRUCKeSERVICES.com: Select the client account and then click on Data Uploads.
- Browse for the State mileage reports you saved in step 7.
- Select the .csv files that you named previously with CompanyAcct_Truck#_Date.
- After file uploads go to TRUCKeSERVICES File Cabinet of the Client and browse your saved information for LAT/LON report (lation_report.tsv) Select “Source Data” for the Department; add Comments describing the content of the file and then Upload.
PCS Data Import Instructions for Excel
What you need to start:
- Your login information for PCS and you log in and password for TRUCKeSERVICES.com
- Be sure truck numbers in the Vehicle List of TRUCKeSERVICES are set up and match the Vehicles set up in PCS.
- Vehicles not set up in TRUCKeSERVICES with an identical unit number will not upload.
- Know the date of the last data upload. Do not upload data for the same date range more than once.
Now that you are ready:
- Open the PCS software on your desktop.
- After clearing all loads/trips, go to the “FLEET” tab.
- Select “Fuel Reports” then “Truck Mileage by State”.
- Set dates for the month needed. (Download one month of data at a time).
- EXPORT the report using the Export Format = “Excel Worksheet 97(.xls).
- A data file will be generated.
- Save the file with a name that helps Identify the range of dates in the report.
- Be sure to save to a folder where you can “Browse” to upload into TRUCKeSERVICES.
- Next, upload the data file to TRUCKeSERVICES by logging into TRUCKeSERVICES.com.
- Be sure the Dashboard shows the company whose data you are about to upload!
- Choose “DATA UPLOAD”. Then select MILEAGE UPLOAD then choose “PCS – Excel” from the drop-down menu.
- Browse for the file just exported from PCS. The screen will display a message to wait while it imports the data.
- When the data upload is completed, verify no errors occurred during the upload. If any errors are reported to the screen, print the screen and review errors.
- After the file uploads, it will be saved in the File Cabinet of the Company and available anytime needed for additional information or audits.
Trimble State Mileage – Data Import Instructions
What you need to start:
- Your login information for www.trimble.com/fsm and for www.TRUCKeSERVICES.com.
- Be sure truck numbers in the Vehicle List of TRUCKeSERVICES are set up and match the vehicles set up in Trimble.
- Vehicles not set up in TRUCKeSERVICES with an identical unit number will not upload!
- Know the date of the last data upload. Do not upload data for the same date range more than once.
Now that you are ready:
- Open Internet Explorer or Google Chrome and go to www.trimble.com/fsm.
- Click on “CUSTOMER LOGIN’
- Select Geomanager-Region Americas.
- Fill in User Name and Password.
- Click on the “Reports” tab.
- Select “State Mileage” report from the drop-down menu.
- Choose the unit numbers of the mobile devices you want to gather data for.
- Choose the time period for the data you want to collect. We recommend gathering trip data at the end of each month. Be careful not to gather duplicate data.
- Chose the Report Format – “Downloadable File (Tab Delimited). Click in the box to “Include Header” in the file. Click “GENERATE REPORT”. A “File Download” window appears at the bottom of the screen. Choose “SAVE AS” and assign the file a name and folder location that you can navigate to later. The file name should include the end of the period date to make it unique and clarify what data is stored in the file.
- Save one more file for audit purposed only. Repeat Steps 6-9 but this time chose “LatLon” report. Archive this report in case you are chosen for an audit. It contains the source data auditors may require, but may not be available from Trimble at a later date.
To import this data file into TRUCKeSERVICES.com
- Open another window in your browser and go to TRUCKeSERVICES.com
- Search for the Company whose data you want to import and make sure their name appears on the Dashboard.
- Click on the “Data Upload” button and then the “Mileage Upload button.
- Choose “Trimble” from the drop-down menu.
- Fill in a “Start Date” to assign to the data being imported.
- Choose the “State Mileage” file downloaded from Trimble. Navigate to the folder and to the file you saved and click on “Open”.
- Click on “Upload”.
- When all the data is uploaded a message will appear on the screen confirming the data was successfully uploaded. If errors are detected, they will print to the screen. Print the screen and investigate any errors and correct them if required.
Fuel Data Import
Comdata – Data Import Instructions
What you need to start:
- Your login information for www.iconnectdata.com and for www.TRUCKeSERVICES.com.
- Be sure truck numbers in the Vehicle List of TRUCKeSERVICES are set up and match the Vehicles set up in Comdata.
- Vehicles not set up in TRUCKeSERVICES with an identical unit number will not upload!
- Know the date of the last data upload. Do not upload data for the same date range more than once.
Ready?
- Log in to www.iconnectdata.com. Choose “Reporting” then “DataQ”.
- Choose “QuickReports”.
- Choose “TMRIndividualTransactionPriceSummary. Leave all criteria blank except the date.
- Choose Beginning and Ending dates for the month of activity you are filing.
- Chose “Excel Download”.
- Save the Excel file to your desktop.
- Go to TRUCKeSERVICES.COM.
- Be sure the correct Client Name is selected on the Dashboard.
- Choose “DATA UPLOAD”. Then select FUEL UPLOAD then choose Comdata from the drop down menu.
- Browse for the file just saved from the Comdata site and then click ‘UPLOAD”
- If any errors are reported to the screen, print the screen and review errors. Fix any errors when necessary.
- After the file uploads, it will be saved in the File Cabinet of the Company and available anytime needed for additional information or audits.
FleetOne Diesel Fuel Data Import Instructions
What you need to start:
- Your login information for www.FleetOne.com and for TRUCKeSERVICES.com.
- Verify truck numbers in the Vehicle List of TRUCKeSERVICES match the Unit # set up in the FleetOne report.
- Vehicles not set up in TRUCKeSERVICES with an identical unit number will NOT upload.
- Know the date of the last data upload. Do not upload the data for the same date range more than once.
Now that you are ready:
- Go to www.FleetOne.com. Log in with your Client’s password and click SUBMIT. Type in screen prompt and click SUBMIT again.
- Select “Transaction Reports” on the menu at the top of the window.
- Select “Weekly Transactions by Date” from the drop-down menu.
- Fill in “Start Date” and “End Date”. Use the beginning and ending date of each month. (Even though it suggests a weekly report, the range of dates can be an entire month.) Click SUBMIT.
- Click on the DOWNLOAD REPORT hyperlink in the top center of the window.
- A “Display As” box appears – select CSV.
- The report downloads to your default download directory. Open the file and SAVE AS a .csv file. Use the following format to name the file: ACCT#_YYYYMMDD_FleetOne.csv Save it to a folder where you can browse to find it later.
- Now log into TRUCKeSERVICES.com. Choose the client whose data you want to upload.
- From the Client dashboard, choose DATA UPLOAD.
- Select FUEL UPLOAD and choose “FleetOne .csv”
- Browse for the .csv file downloaded from the FleetOne website. Click on UPLOAD to bring the fuel data into TRUCKeSERVICES.com.
Note: Only data the matches a truck # in the Vehicle table will upload. Any other truck int the FleetOne file but NOT in TRUCKeSERVICES will display as an error. To fix errors, add the Truck # to the Vehicle page, modify the csv file to contain only the missing trucks and upload again.
API Instructions
Geotab Data Upload Instructions
What you need to start:
- A client with an active GeoTab account.
- That same client set up in TRUCKeSERVICES.
- The trucks set up on TRUCKeSERVICES.com with exact matching truck numbers and VIN numbers. If these elements don’t match exactly your data will not import.
Now that you are ready:
- Call your Geotab Vendor and ask very nicely that they add the TRUCKeSERVICES team as an administrator on your account.
- GeoTab Instructions:
a. Login to the Geotab site.
b. Open the Administration tab.
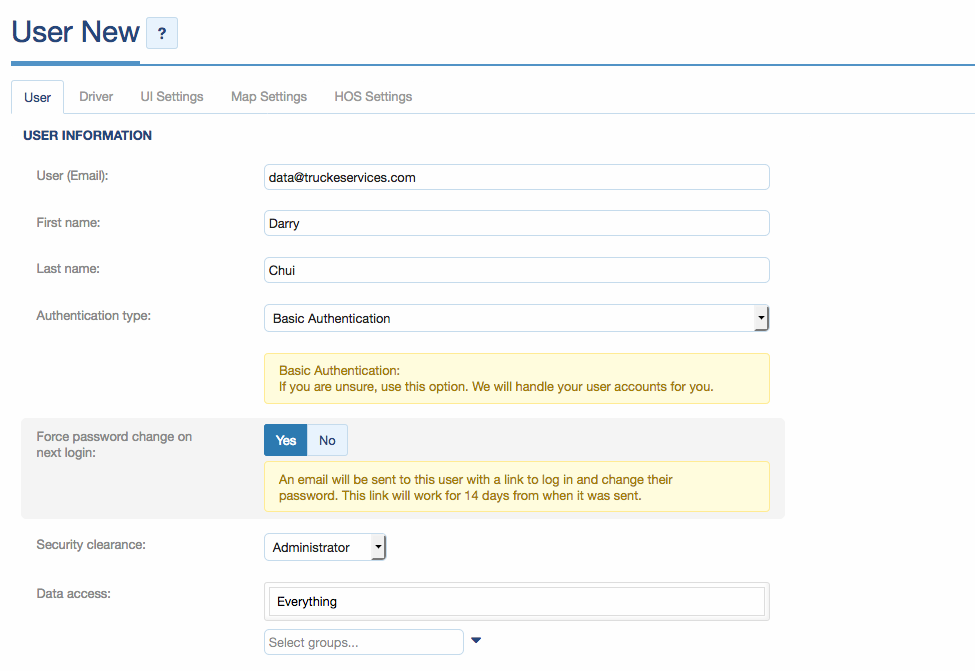
c. Navigate to add a new user.
d. User Email: data@truckeservices.com
e. Name: Darry Chui
f. Select “Yes” to question “Force password change on next login:”
g. Administrative type: Basic Administrator
h. Security Clearance: Administrator
i. Data Access: Everything
j. Save
3. Then shoot an email to data@truckeservices.com with:
a. The client’s name and DOT# (if there was more than one client, you can send them all in one email.)
b. The start date for each client. The start date is the date you want us to begin pulling data from. We can start from whenever you like after the Geotab device is activated and reporting.
4. We will bring in the data from your start date within five business days. Then the system will automatically update twice a month on the 1st and the 16th with the new data so you’re always up to date.
5. We only bring in Miles with the API – not fuel. So, you’ll need to get your fuel data from another source or enter it manually.
Note: Only data that matches a Truck # and VIN # in the Vehicle table will upload. Any other trucks in Geotab but NOT in TRUCKeSERVICES will not upload.
PeopleNet API – Data Upload Instructions
What you need to start:
- A client with an active PeopleNet account
- The PeopleNet “Authorization for Electronic Data” form signed by your client.
- That same client set up on TRUCKeSERVICES.com.
- The trucks must be set up on TRUCKeSERVICES.com with exact matching truck numbers and VIN numbers. If these elements don’t match your data will not import.
Now that you are ready:
- PeopleNet charges for this data and that charge will be billed to you each month If you request we set up this API then you are agreeing to pay these extra fees from PeopleNet.
- Send an email to data@TRUCKeSERVICES.com with:
- The signed authorization form.
- The client’s name and DOT# (If there is more than one client, you can send them all in one email.)
- We will begin bringing in the data within five business days. Then the system will automatically bring in the new data monthly so you’re always up to date.
- We only bring in Miles with the API – not fuel. So you’ll need to get your fuel data from another source.
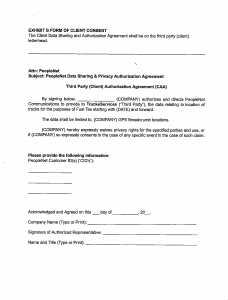
NOTE: Only data that matches a Truck # and VIN # in the Vehicle table will upload. Any other trucks in PeopleNet but NOT in TRUCKeSERVICES will not upload. The Client consent for will look like the image below:
 Click here to download .pdf
XRS / API Data Import Instructions
What you need to start:
- A client with an active Omnitrax XRS account
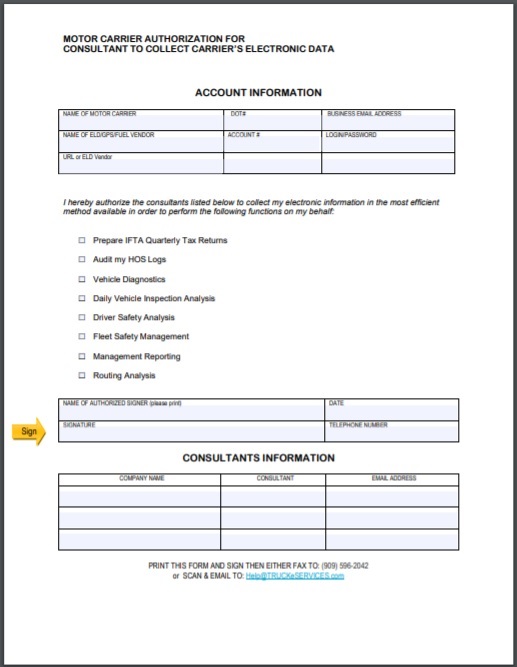
- The “Motor Carrier Authorization for Consultant to Collect Carrier’s Electronic Data” form signed by your client. (Example of this form is shown below.)
- That same client set up in TRUCKeSERVICES.com with exact matching truck numbers and VIN numbers. If these elements don’t match your data will not import.
Now that you are ready:
- Send an email to data@truckeservices.com with:
- The signed authorization form.
- The client’s name and DOT# (If there is more than one client, you can send them all in one email).
- The start date for each client. The start date is the date you want us to begin pulling data from XRS. We can start whenever you like.
- We will bring in the data from your start date within five business days. Then the system will automatically update twice a month on the 1st and the 16th with the new data so you are always up to date. (XRS takes two weeks to update their data, so on the 1st, we pull data from the previous month the 1st thru the 15th. Example: On February 1st we pull data from January 1st thru the 15th.)
- We only bring in Miles with the API – not fuel. So you’ll need to get your fuel data from another source.
NOTE: Only data that matches a truck # and VIN # in the Vehicle table will upload. Any other trucks in XRS but NOT in TRUCKeSERVICES will not upload.
Authorization form: Click here to download fillable pdf of this form.
TRUCKeSERVICES Templates
Vehicle List Data Import Instructions
What you need to start:
- It will help to have your 2290Tax.com open and logged in as well as your TRUCKeSERVICES.com account open and logged in. Of course, for that, you will need your log in information.
Now that you are ready:
- Go to 2290Tax.com/
- Select “Add or Edit Vehicles”
- Select “MS Excel Spreadsheet in the upper right (That will export your fleet list to a file called Fleet_List.xls) Save that file to your desktop.
- You can add and delete vehicles from this file to bring it up to date before you upload to TRUCKeSERVICES.
- Click on your open TRUCKeSERVICES.com tab and navigate to the data upload page.
- Select “Vehicle List”
- Select “Choose File” and go to your desktop where you saved your Fleet_List.xls downloaded information
- Now click UPLOAD.
- The list of your vehicles should now show up under the Vehicle List button. It’s that easy.
- Additional set-up information for each vehicle may be required – i.e. permits, weight, axles etc. – if you uploaded only information contained in www.2290tax.com. Vehicle set-up information must be complete in order for all features in TRUCKeSERVICES are in full working order.
1Truck1TripUS Data Import Instructions
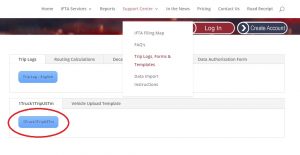
What you need to start:
- A blank template from the Support Center > Logs, Forms and Templates page. Save the file as a “.xls” to your computer somewhere you can easily find it again. You can either download a new template each time you need it or work from the one you saved originally. When you upload, we’ll save the file to your File Cabinet, so you’ll always have the finished version online.
- Your Clients’ mileage and fuel data.
- The truck set-up on TRUCKeSERVICES.com with an exact matching truck number. If the truck numbers don’t match your data will not upload.
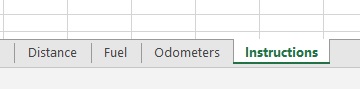
- Open the saved .xls file and your client’s mileage and fuel data. Notice there are four sheets in the spreadsheet: Distance, Fuel, Odometers, and Instructions.
- We recommend you enter distance first and fuel second.
- You can enter miles two ways: by distance, or by the odometer. Choose which method you will use before you begin and start with the appropriate sheet, but do NOT enter both miles and odometers.
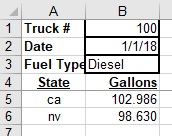
- On the top of the Distance or Odometer sheet start by filling in the Truck Number, Trip Date, and Beginning Odometer (if you have the Odometer).
- Then you can enter the state and miles, or odometer, within that state from your client’s trip sheets.
- You can only enter 1000 lines of data.
- When you’re done with miles, switch to the fuel sheet. Be sure the truck number and the trip date are still visible. The type of fuel (Diesel, Gas, CNG etc) must match the type set up in the Vehicle List.
- Then enter the state and gallons, either as totals by state, or individual purchases.
- Again, you can only enter 1000 lines of data.
- When you have completed your data entry, check for errors and save your file.
- Log into TRUCKeSERVICES.com, and search for your client.
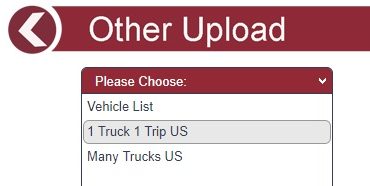
- From your client’s Dashboard, choose “Data Upload”
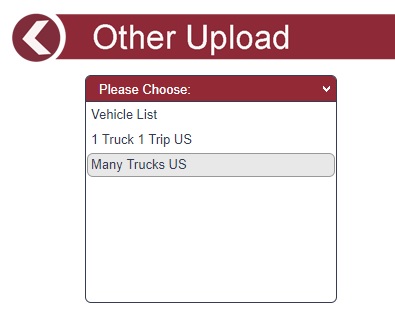
- Then under “Other Upload” choose 1Truck1TripUS and upload the file you saved earlier.
- The original file will be saved to your file cabinet, the date will be entered into the system, and a message will display with your success or errors for that upload.
Many Trucks Many Trips – Data Import Instructions
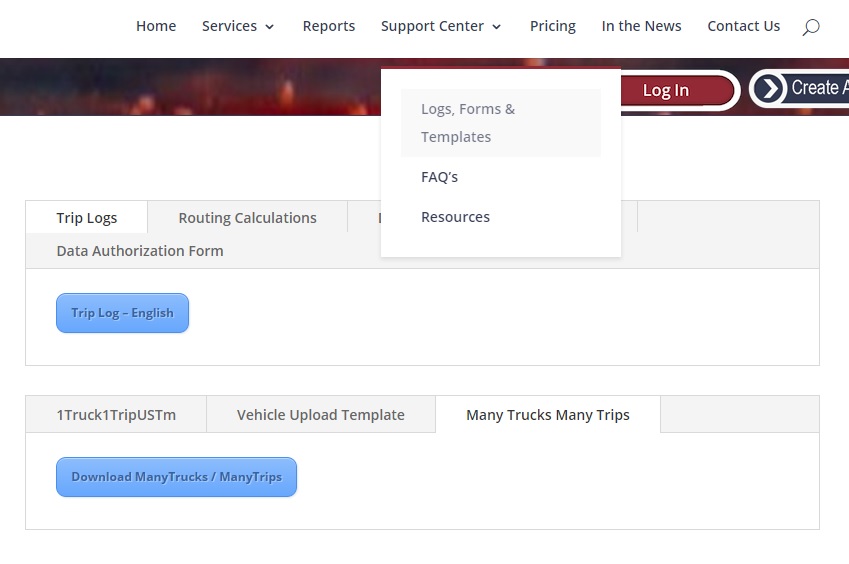
- A blank template from the Support Center Logs, Forms, and Templates page. Save the file as a “.xls” file to your computer somewhere you can easily find it again. You can either download a new template each time you need it or work from the one you saved originally. When you upload we’ll save the file to your file Cabinet, so you’ll always have the finished version online.
- Your clients’ mileage and fuel data. The trucks set up on TRUCKeSERVCIES.com with exact matching truck numbers. If the vehicle numbers don’t match your data will not upload.
Now that you are ready, open the saved .xls file and your client’s mileage and fuel data. Notice there are 3 sheets in the spreadsheet: “Distance”, “Fuel”, and “Instructions”.
- We recommend you enter distance first and fuel second. You can enter information for more than one truck at a time with this template.
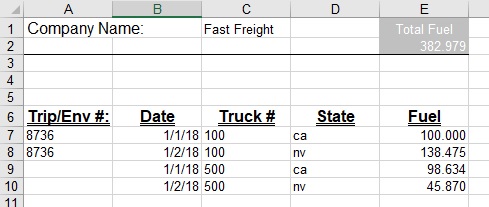
- On the top of the Distance sheet, start by filling in the Company Name.
- Then you can enter Trip or Envelope #, Date, Truck #, State, Distance, and Odometer. Required fields are Date, Truck #, State and either Distance or Odometer. Other fields can be left blank if they are not needed.
- You can only enter 1000 lines of data.
- When you’re done with miles, switch to the fuel sheet. The fuel type must match the truck set up on your Vehicle List.
- Enter your Trip or Envelope #, Date, Truck, State, and Gallons, either as totals by the state, for individual purchases.
- When you have completed your data entry, check for errors and save your file.
- Login to TRUCKeSERVICES.com, and search for your client.
- From your Client’s Dashboard, choos, “Data Upload”.
- Then under “Other Upload” choose “Many Trucks US” and upload the file you saved earlier.
- The original file will be saved to the File Cabinet, the data will be entered into the system and a message will display with your success and errors for that upload.